Showing posts with label HARDWARE. Show all posts

Tuesday, 6 November 2012

VIRTUAL MEMORY

What is virtual memory?
If your computer lacks the random access memory (RAM) needed to run a program or operation, Windows uses virtual memory to compensate.
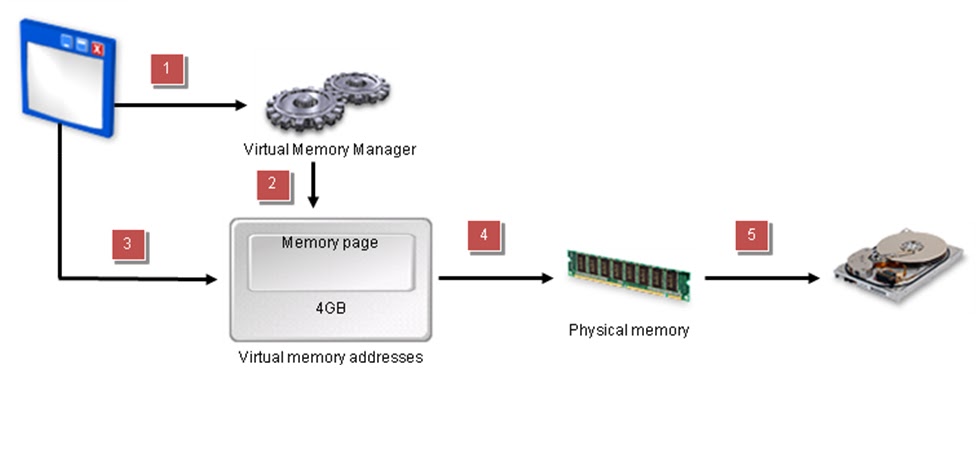
Virtual memory combines your computer’s RAM with temporary space on your hard disk. When RAM runs low, virtual memory moves data from RAM to a space called a paging file. Moving data to and from the paging file frees up RAM to complete its work.
The more RAM your computer has, the faster your programs will generally run. If a lack of RAM is slowing your computer, you might be tempted to increase virtual memory to compensate. However, your computer can read data from RAM much more quickly than from a hard disk, so adding RAM is a better solution.

Virtual memory and error messages
If you receive error messages that warn of low virtual memory, you need to either add more RAM or increase the size of your paging file so that you can run the programs on your computer. Windows usually manages the size automatically, but you can manually change the size of virtual memory if the default size is not enough for your needs. For more information, see  


How to increase Virtual Memory?


In Windows XP
1.Click Start, and then click Control Panel.
2.Click Performance and Maintenance, and then click System.
3.On the Advanced tab, under Performance, click Settings.
4.On the Advanced tab, under Virtual memory, click Change.
5.Under Drive [Volume Label], click the drive that contains the paging file that you want to change.
6.Under Paging file size for selected drive, click to Custom size check box. You can enter the amount of memory you would like to reserve for Virtual memory by entering the initial and maximum size.
7.Click Set
When you are prompted to restart the computer, click Yes.
Special Note: You should choose the same amount for the initial size and maximum size. This will Stop your CPU from constantly changing the paging file.

HOT TIP: To stop your CPU from constantly changing the paging file, set the initial and maximum size to the same value. For example, 500 and 500. The value should be at least 1.5 times more than your physical RAM. If your computer has 512MB of RAM increase the virtual memory paging file to 1.5*512= 768

In Vista/Win 7
1. Click Start button Picture of the Start button
2. Click Control Panel
3. Choose System and Maintenance and then click System.
4. In the left pane, click Advanced system settings.
5.On the Advanced tab, under Performance, click Settings.
6. Click the Advanced tab, and then, under Virtual memory, choose Change.
7. Click Custom to change the Initial size (MB) and Maximum size. See the hot tip above.


Remember to choose the drive you would like to use to increase the virtual memory. In most cases it usually your C: Drive. You can set the initial size and maximum size after clicking the Custom size check box.Remember its better to keep the Virtual memory values the same.

Also having enough available space is absolutely necessary for your virtual memory and RAM to function properly.

Friday, 12 October 2012

COMPUTER QUIZ

COMPUTER QUIZ
(To see correct answers, move mouse over options, answer will be highlighted)
1. Which of the following communication mode supports data transmission in
    both directions at the same time?   
  
    a) Simplex
    b) Duplex
    c) Half simplex
    d) Full duplex
    e) Multiplex

2. Which of the following transmission techniques let computer to
    alternatively send and receive data?

    a) Duplex
    b) Simplex
    c) Half duplex
    d) Full duplex
    e) None of above

3.  Modulation is the process of :
     a) Echoing every character that is received
     b) Converting digital signals to analog signals
     c) Converting analog signals to digital signals
     d) Sending a file from one computer to another computer
     e) None of above

4. A modem performs-
    a) Modulation
    b) Demodulation
    c) Data compression
    d) Both (a) & (b) 
    e) All (a), (b) & (c)

5. Which of the following keyboard format is most commonly used?
    a) TWRITER
    b) SPLITTER
    c) QWERTY
    d) Dvorak
    e) None of the above

6. The function of key F4 in a word processing application is -
    a) to repeat the last action
    b) to open a saved document
    c) to delete the highlighted text
    d) to open context menu of highlighted text
    e) None of above

7. Laser printer is an example of -
    a) Impact printer
    b) Inkjet printer
    c) Non-Impact printer
    d) Dot-matrix printer
    e) None of above

8. which of the following is a term related with scanners?
    a) Laser
    b) TWAIN
    c) QWERTY
    d) Media
    e) Cartridge

9. The resolution of a monitor depends on:
    a) Dot pitch of the monitor
    b) Number of bits representing a pixel
    c) Number of pixels that can be displayed
    d) Both (a) & (b)
    e) All (a), (b) & (c)

10. What does the term ISO stands for?
    a) Information System Output
    b) International Standards Organization
    c) International Systems organization
    d) Integrated Services Organization
    e) None of above

Tuesday, 9 October 2012

HISTORY OF COMPUTER

What is a Computer


In its most basic form a computer is any device which aids humans in performing various kinds of computations or calculations. In that respect the earliest computer was the abacus, used to perform basic arithmetic operations.
Every computer supports some form of input, processing, and output. This is less obvious on a primitive device such as the abacus where input, output and processing are simply the act of moving the pebbles into new positions, seeing the changed positions, and counting. Regardless, this is what computing is all about, in a nutshell. We input information, the computer processes it according to its basic logic or the program currently running, and outputs the results.
Modern computers do this electronically, which enables them to perform a vastly greater number of calculations or computations in less time. Despite the fact that we currently use computers to process images, sound, text and other non-numerical forms of data, all of it depends on nothing more than basic numerical calculations. Graphics, sound etc. are merely abstractions of the numbers being crunched within the machine; in digital computers these are the ones and zeros, representing electrical on and off states, and endless combinations of those. In other words every image, every sound, and every word have a corresponding binary code.
While abacus may have technically been the first computer most people today associate the word “computer” with electronic computers which were invented in the last century, and have evolved into modern computers we know of today.
ENIAC

First Generation Computers (1940s – 1950s)

First electronic computers used vacuum tubes, and they were huge and complex. The first general purpose electronic computer was the ENIAC (Electronic Numerical Integrator And Computer). It was digital, although it didn’t operate with binary code, and was reprogrammable to solve a complete range of computing problems. It was programmed using plugboards and switches, supporting input from an IBM card reader, and output to an IBM card punch. It took up 167 square meters, weighed 27 tons, and consuming 150 kilowatts of power. It used thousands of vacuum tubes, crystal diodes, relays, resistors, and capacitors.
The first non-general purpose computer was ABC (Atanasoff–Berry Computer), and other similar computers of this era included german Z3, ten British Colossus computers, LEO, Harvard Mark I, and UNIVAC.

IBM 1401

Second Generation Computers (1955 – 1960)

The second generation of computers came about thanks to the invention of the transistor, which then started replacing vacuum tubes in computer design. Transistor computers consumed far less power, produced far less heat, and were much smaller compared to the first generation, albeit still big by today’s standards.
The first transistor computer was created at the University of Manchester in 1953. The most popular of transistor computers was IBM 1401. IBM also created the first disk drive in 1956, the IBM 350 RAMAC.

Third Generation Computers (1960s)


IBM System/360
The invention of the integrated circuits (ICs), also known as microchips, paved the way for computers as we know them today. Making circuits out of single pieces of silicon, which is a semiconductor, allowed them to be much smaller and more practical to produce. This also started the ongoing process of integrating an ever larger number of transistors onto a single microchip. During the sixties microchips started making their way into computers, but the process was gradual, and second generation of computers still held on.
First appeared minicomputers, first of which were still based on non-microchip transistors, and later versions of which were hybrids, being based on both transistors and microchips, such as IBM’s System/360. They were much smaller, and cheaper than first and second generation of computers, also known as mainframes. Minicomputers can be seen as a bridge between mainframes and microcomputers, which came later as the proliferation of microchips in computers grew.

Fourth Generation Computers (1971 – present)

First microchips-based central processing units consisted of multiple microchips for different CPU components. The drive for ever greater integration and miniaturization led towards single-chip CPUs, where all of the necessary CPU components were put onto a single microchip, called a microprocessor. The first single-chip CPU, or a microprocessor, was Intel 4004.
The advent of the microprocessor spawned the evolution of the microcomputers, the kind that would eventually become personal computers that we are familiar with today.

First Generation of Microcomputers (1971 – 1976)

Altair 8800
First microcomputers were a weird bunch. They often came in kits, and many were essentially just boxes with lights and switches, usable only to engineers and hobbyists whom could understand binary code. Some, however, did come with a keyboard and/or a monitor, bearing somewhat more resemblance to modern computers.
It is arguable which of the early microcomputers could be called a first. CTC Datapoint 2200 is one candidate, although it actually didn’t contain a microprocessor (being based on a multi-chip CPU design instead), and wasn’t meant to be a standalone computer, but merely a terminal for the mainframes. The reason some might consider it a first microcomputer is because it could be used as a de-facto standalone computer, it was small enough, and its multi-chip CPU architecture actually became a basis for the x86 architecture later used in IBM PC and its descendants. Plus, it even came with a keyboard and a monitor, an exception in those days.
However, if we are looking for the first microcomputer that came with a proper microprocessor, was meant to be a standalone computer, and didn’t come as a kit then it would be Micral N, which used Intel 8008 SAmicroprocessor.
Popular early microcomputers which did come in kits include MOS Technology KIM-1, Altair 8800, and Apple I. Altair 8800 in particular spawned a large following among the hobbyists, and is considered the spark that started the microcomputer revolution, as these hobbyists went on to found companies centered around personal computing, such as Microsoft, and Apple.

Second Generation Microcomputers (1977 – present)


Commodore PET2001 (Image by Tomislav Medak licensed under CC-BY-SA).
As microcomputers continued to evolve they became easier to operate, making them accessible to a larger audience. They typically came with a keyboard and a monitor, or could be easily connected to a TV, and they supported visual representation of text and numbers on the screen.
In other words, lights and switches were replaced by screens and keyboards, and the necessity to understand binary code was diminished as they increasingly came with programs that could be used by issuing more easily understandable commands. Famous early examples of such computers include Commodore PET, Apple II, and in the 80s the IBM PC.
The nature of the underlying electronic components didn’t change between these computers and modern computers we know of today, but what did change was the number of circuits that could be put onto a single microchip. Intel’s co-founder Gordon Moore predicted the doubling of the number of transistor on a single chip every two years, which became known as “Moore’s Law”, and this trend has roughly held for over 30 years thanks to advancing manufacturing processes and microprocessor designs.
The consequence was a predictable exponential increase in processing power that could be put into a smaller package, which had a direct effect on the possible form factors as well as applications of modern computers, which is what most of the forthcoming paradigm shifting innovations in computing were about.

Graphical User Interface (GUI)

Macintosh 128k (Image by All About Apple museum licensed under CC-BY-SA-2.5-it)
Possibly the most significant of those shifts was the invention of the graphical user interface, and the mouse as a way of controlling it. Doug Engelbart and his team at the Stanford Research Lab developed the first mouse, and a graphical user interface, demonstrated in 1968. They were just a few years short of the beginning of the personal computer revolution sparked by the Altair 8800 so their idea didn’t take hold.
Instead it was picked up and improved upon by researchers at the Xerox PARC research center, which in 1973 developed Xerox Alto, the first computer with a mouse-driven GUI. It never became a commercial product, however, as Xerox management wasn’t ready to dive into the computer market and didn’t see the potential of what they had early enough.
It took Steve Jobs negotiating a stocks deal with Xerox in exchange for a tour of their research center to finally bring the user friendly graphical user interface, as well as the mouse, to the masses. Steve Jobs was shown what Xerox PARC team had developed, and directed Apple to improve upon it. In 1984 Apple introduced the Macintosh, the first mass-market computer with a graphical user interface and a mouse.
Microsoft later caught on and produced Windows, and the historic competition between the two companies started, resulting in improvements to the graphical user interface to this day.
Meanwhile IBM was dominating the PC market with their IBM PC, and Microsoft was riding on their coat tails by being the one to produce and sell the operating system for the IBM PC known as “DOS” or “Disk Operating System”. Macintosh, with its graphical user interface, was meant to dislodge IBM’s dominance, but Microsoft made this more difficult with their PC-compatible Windows operating system with its own GUI.

Portable Computers

Powerbook 150 (Image by Dana Sibera licensed under CC-BY-SA.)
As it turned out the idea of a laptop-like portable computer existed even before it was possible to create one, and it was developed at Xerox PARC by Alan Kay whom called it the Dynabook and intended it for children. The first portable computer that was created was the Xerox Notetaker, but only 10 were produced.
The first laptop that was commercialized was Osborne 1 in 1981, with a small 5″ CRT monitor and a keyboard that sits inside of the lid when closed. It ran CP/M (the OS that Microsoft bought and based DOS on). Later portable computers included Bondwell 2 released in 1985, also running CP/M, which was among the first with a hinge-mounted LCD display. Compaq Portable was the first IBM PC compatible computer, and it ran MS-DOS, but was less portable than Bondwell 2. Other examples of early portable computers included Epson HX-20, GRiD compass, Dulmont Magnum, Kyotronic 85, Commodore SX-64, IBM PC Convertible, Toshiba T1100, T1000, and T1200 etc.
The first portable computers which resemble modern laptops in features were Apple’s Powerbooks, which first introduced a built-in trackball, and later a trackpad and optional color LCD screens. IBM’s ThinkPad was largely inspired by Powerbook’s design, and the evolution of the two led to laptops and notebook computers as we know them. Powerbooks were eventually replaced by modern MacBook Pro’s.
Of course, much of the evolution of portable computers was enabled by the evolution of microprocessors, LCD displays, battery technology and so on. This evolution ultimately allowed computers even smaller and more portable than laptops, such as PDAs, tablets, and smartphones.


Monday, 16 July 2012

UPDATE YOUR HARDWARE RESUME PROFILE


                                                        RESUME

NAMEXXXXXXXXXXXXX
Local Add.Xxxxxxxxxxxxxxxx
xxxxxxxxxxxxxxxxxxxxxxxxxx
Mob.9648XXXXXXXXXXXX

Objective

Aspire to serve a reputed organization with best of my professional skill as a Hardware Engineer.


Personal Summary

  • Expert in system installation, configuration, administration, and integration.
  • Analytical and technical expertise.
  • Expert in network operations.
  • Creative, curious, analytical, and detail-oriented.
  • Interactive ability and target centric


Technical Skills

  • Operating Systems: Windows9X, Windows2000, Windows ME, Windows XP, Windows Vista, Linux, Unix, MS DOS.
  • Hardware testing Tools: Multi meter, cable tester, Card tester, Soldering de-soldering .
  • Application software Photoshop, Adobe reader, Winrar, DVD Convertor, Nero.
  • Office Package: Microsoft Word, Microsoft Excel, Microsoft Access, Microsoft PowerPoint, Microsoft Outlook Express.
  • Assembling and reassembling of computer peripherals


CMC Academy, 10/2011 - Present
  

Hardware Engineer.
  • Conduct research, designing and develop, test, and supervise the installation of computer hardware.
  • Install chips, circuit boards, systems, modems, keyboards, and printers.
  • Design a variety of programs through computer.
  • Perform the communications link between organization and customers.
  • Work as an association looking into the hardware, software, training and standardization of computer systems.
  • Attend meetings, seminars and conferences and take statewide tours.
  • Maintain updated inventory of all hardware and software.
  • Make coordination for installing and upgrading the current equipments and software.
  • Maintain a standard configuration of equipment.
  • Handled the management of hardware stock and projects.
  • Identified the management position, duties and responsibilities.
  • Looked after physical and investigative processes, including technical support.
  • Accomplished the job of data recovery and system administration.


General Education

  • Pursuing B.Sc. from xxxxxxxxxxxxxxxxxx
  • High School from xxxxxxxxxxxxxxxxxxxx
  • Intermediate from xxxxxxxxxxxxxxxxxxxx
  • Tech(Hardware& Networking) from CMC Academy
  • Specialization in Monitor, and printer


Permanent address


xxxxxxxxxxxxxxxxxxxxxxxxxxxxxxxxxx
Pin.23xxxxxxxxxxx

Friday, 27 April 2012

VIEW ALL TYPES OF RAM


All types of  RAM's along with their informations


Click here to see

Friday, 20 April 2012

TYPES OF COMPUTER ERROR


Blue Screen Computer Freeze


Computer freezing is a very common problem faced by users where the computer suddenly hangs, reboots, or just shuts itself down. This is a big concern as it may lead to data loss and other problems. This is a common problem everyone face and so we should know how to fix it and prevent it from occurring another time. It is mainly caused due to the corruption of the registry files which are important files that help in the running of the computed. Any fault in these files can lead to a mess up which leads to the crashing of the computer. There are many different causes that lead to the freezing of the computer. The access files in the computer are used for the storage of large amount of data. If any altering of the access files occurs then the whole program will be affected. When a person is browsing through the internet they will collect huge amount of information and data which may have some errors or malicious information. This may corrupt the registry files of the operating system and lead to computer freezing. These files are unwanted and they should be removed from the computer to avoid the corruption of files and to prevent any damage. 


Users should repair the registry files by either deleting or repairing the files. This can be done with the help of scan programs that will automatically clean up the unwanted files and repair and quarantine the required files. These programs will help in creating a back up file that will help in tracing the data and prevent any loss of information. Registry fix is a risk free program and it will not damage the files of the computer. All users should install the scan software before they encounter any problems of data loss. This is the best way to fix the registry file problems and helps in solving the errors which help in the proper functioning of the computer. It will help in providing optimum efficiency to the computer. Always use antivirus software for your computer and keep updating it from the website of the manufacturers. Install good spyware tools to the computer and keep away all the harmful spyware that may affect your computer. 


It is important to leave some space in your computer and don’t fill it up full. The drive in which the windows is installed should have some free space. If the system has low resources then you should go for a disk clean up which will help in removing all the unwanted files that are present in the computer. The computer should be constantly checked for overheating. Overheating is one of the reasons for computer freezing. If the fan in the processor does not work properly then it may lead to overheating. In this case the motherboard will get damaged and the computer will suffer problems. These things should be checked constantly when using a computer and you will be able to prevent computer freezing. It is always said that prevention is better than cure so keep the computer in good shape to get the best out of it. 

How to Quickly Fix Computer Freezes
Bottom line is that anytime your computer freezes it is a bad thing and something is broken with your computer that needs fixed immediately without causing costly damage to your computer. We recommend that you run a free scan of your computer to find all of the hidden errors that is causing your computer to freeze. Don’t let these errors slow down your computer causing you to pull your hair out in frustration. Not taking action to clean up your computer can cause $100’s of dollars not including countless hours of lost productivity. Remove every error and experience a flawless running, super fast PC just like it was when you first bought it. The great news is that all of this can be done by performing a Free Scan of your computer and in less than 2 minutes you can take care of the problem.


Error 1706


Error 1706 is referred to as a Microsoft Office Error message which generates when installing any Windows program. This error indicates that these required files are not found in your setup. Sometimes the text for Error 1706 includes the phrases like “no source can be found” on your computer screen. This type of error occurs due to few reasons which include either you originally install Microsoft program from the network administration, you are trying Microsoft CD-ROM when you are restricted by the Windows Installer for exact location or the network administration is not available in your system. In these cases the Microsoft reports that Office XP and MS Office 2003 setup have some problem.
 
This kind of problem can also occur when you posses an unlicensed version of MS Office 2003 or you have not yet registered it. It can also occur due to the Group Policy setting on your personal computer which prevents access to the installation files. There are many other reasons why this kind of problem and the simplest problem can be that the DVD-ROM or CD-ROM may be having difficulty reading the disk and perhaps require to be cleaned. At times it can be a serious problem with Windows Installer or Registry program. So, check and ensure that CD or DVD-ROM which you are installing or even updating is original and that both the disks and clean. Error 1706 can have several serious possible causes. 

One of the files may be needed by the application can have been deleted and this may lead to this kind of error. This can happen if you have installed different kind of program and it did not read the existing files. In order to find out what are the files which are missing from your application you have to analyze all your logs and see which path that is labeled is not available. As you find the file name then you can find a particular file by utilizing the search feature that is located on the start menu. However, if nothing is the result of your search then you can reinstall that program. A PC optimizer or registry cleaner such as RegCure can sort out the registry and decide if there are ay conflicts in the system.
 
If this is the case then this problem must be fixed immediately by scanning the RegCure scanner and see if there is any error which has led to this kind of error messages. To fix this problem other than re-installing or uninstalling your Microsoft will certainly need the registry to be edited. This at times can be dangerous if you do not understand exactly what it is. At the most you would require to have a backup as any mistake in editing by using the start or run process can cause complicated failures and your entire information may e lost. There are times when you get some strange error messages when you are about to install some programs with limited freedom or without license. If you do not understand what to do to solve this problem it is better to consult a professional who can solve your problem. 

How to Quickly Fix 1706 Errors
Bottom line with any of these 1706 errors is that you want them removed from your computer immediately without causing costly damage to your computer. We recommend that you run a free scan of your computer to find all of the hidden errors. Don’t let these errors slow down your computer causing you to pull your hair out in frustration. Not taking action to clean up your computer can cause $100’s of dollars not including countless hours of lost productivity. Remove every 1706 error and experience a flawless running, super fast PC just like it was when you first bought it. The great news is that all of this can be done by performing a Free Scan of your computer and in less than 2 minutes you can take care of the problem.


Error 2753


For several users, ‘error messages’ can prove of being confusing and frightening, as they don’t know the problems or the happenings with regards to their system. It should be noted that error 2753 is nothing but one of the internal errors, at times concerned with Norton anti virus or Dell Support programs. Besides, problems arising due to this error might result in termination of application process by your computer. The computer might also crash, or repeatedly try re-booting. It can also quit completely. Error 2753 can be commonly observed after a ‘system problem’, i.e. when the system’s recovery has been done and installation of missing programs takes place again.

Reasons behind occurrence of error 2753
One of the most probable reasons behind occurrence of error 2753 might be that certain age-old file fragments, that too, from missing program still exist in your system’s registry. Such a thing is likely of causing your computer of experiencing errors and having problems, inclusive of error 2753. Most of the programs, with issue of this kind, make no mistake in stating that no problems persist. having run a ‘virus scan’ wouldn’t reveal any sort of malicious software. Moreover, a ‘spyware scan’ would make way for negative results. Apart from all this, you need to know that Firewall doesn’t recognize any of the problems. However, your system would, by all means, experience some error message. This error message would be nothing but ‘Error 2753’.

After having checked each and every security program and found nothing, you might get tempted for throwing in towel. You might also lose your temper to the extent of throwing the machine out of the window; but wait! Do not lose hope. You can easily have your problems solved by resorting to various methods like editing of Windows Registry. As such, Windows Registry cannot be left haywire, as it is the prime component with regards to having held operating files of your system. If you do not take care on this count, changing any of the entries in registry would prove to be highly risky.

Computer wizards find detection of error messages a cake-walk. However, let it be known that such a task is not all that easy. It’s, in fact, extremely troublesome. The basic reason behind occurrence of error 2753 is carelessness on your part. If you are meticulous in terms of having handled your PC, there would be nothing like error 2753 in to existence. 

Computers have performed the task of greatly simplifying our lives. They have, however, brought loads of complexity in this regard, that too, in such a way that no one had ever thought of before. These days, people have started relying on internet connection and computers for literally anything. In fact, certain people consider using computer even for minute operations as a status symbol. There are people who prefer hanging out with friends or going for a long walk as being a better way of warming up themselves. However, such people are looked down upon. So, if you wish to be a computer buff, be prepared to withstand errors like ‘error 2753’.

How to Quickly Fix 2753 Errors
Bottom line with any of these 2753 errors is that you want them removed from your computer immediately without causing costly damage to your computer. We recommend that you run a free scan of your computer to find all of the hidden errors. Don’t let these errors slow down your computer causing you to pull your hair out in frustration. Not taking action to clean up your computer can cause $100’s of dollars not including countless hours of lost productivity. Remove every 2753 error and experience a flawless running, super fast PC just like it was when you first bought it. The great news is that all of this can be done by performing a Free Scan of your computer and in less than 2 minutes you can take care of the problem.

Thursday, 19 April 2012

How to make Bootable Windows XP PenDrive

    • How to make Bootable Windows XP PenDrive

      Boot from 
      USB is more faster than boot from CD Drive. You can easily install Windows XP from a Pen drive by making your Pen Drive Bootable. Here is the process to make Bootable Pen Drive.
      To make bootable windows xp pendrive please visitwww.emdadblog.com From now I am available to this site and you will get all the replay and update blog post at this site. This blog site emdadblog.blogspot.com will no longer be updated. 


      Thanks


      Emdad

      First Download this USBMultiboot10.zip

      You must do
      Unzip the file after downloading 
    • folder will be created as "USB-Multiboot_10"
    • Now insert your minimum 1 GB pen drive into USB port
    Note : Make sure that you have Backup your data from Pen drive. Because yourPen Drive will be  formatted during making bootable pen drive process.


    Now follow this steps :


    • Open USB_Multiboot_10.cmd from USB_multiboot_10 folder
    • Press any key to Continue... A message will be appear. Press ENTER
    • From Enter your choice : type P and press ENTER
    • Now  Pen derive format option will come and format your pen drive. See below pictures...

    Bootable Windows Xp Pendrive


    Bootable Windows Xp Pendrive

    Bootable Windows Xp Pendrive


    Bootable Windows Xp Pendrive

    Bootable Windows Xp Pendrive

    Bootable Windows Xp Pendrive

    Bootable Windows Xp Pendrive

    • Now insert your XP CD in your CD Rom
    • Type 1 and press ENTER in Enter your choice
    • Locate the XP CD installation Disk
    • Choose YES when unattended install option appear

    Now insert the below information on by one and press OK
    Owner Name = emdadblog (Your Name)
  1. Organization Name = Emdadblog(Your Name)
  2. Product Key = XXXXX-XXXXX-XXXXX-XXXXX-XXXXX(your Xp serial Key)
  3. Computer Name = Emdadblog(your computer name)
  4. Administrator Password = XXXX(Your password)
  5. Time Zone = Your time zone
  6. Workgroup Name = Emdadblog(Your name)
  7. User Name = Emdadblog(Your name)
Now press OK
  • Type 2 and press ENTER in choice 2
  • Now locate your pen drive location
  • Type 3 and press enter
  • Now the process will continue to make bootable XP Pen drive
Note : During the installation process never disconnect the pen drive from USBport until the first time windows desktop appear.

In many computer during the installation process after restarting first time a error hall.dll will come. In this situation  to boot from pen drive choose "2.and 3. Continue with GUI mode setup Widnows XP + Start XP from HD 1" from boot menu option and press  ENTER

How to make Windows 7 Bootable USB Pendrive


How to make Windows 7 Bootable USB Pendrive

Hello,

Many of us face a lot of problem when we have to reinstall windows on our computer or laptop. First thing we have to decide from where to install windows? The options available are DVD or USB Pendrive. In the latest new netbooks, mostly there is no DVD drive. So if you want to install windows you have to go with the other option, i.e. USB Pendrive. So here I give a brief and 100% tested tutorial on how to create a Windows 7 Bootable USB Pendrive to install Windows 7 from USB Pendrive.
First thing, you should check whether your BIOS supports booting from USB. Most of the computer/laptops support. But if your BIOS doesn’t, then sorry, you cannot boot from a USB Pendrive.
Second thing, you need another computer with Windows installed with a DVD drive, to copy its contents later.
So let us start with the procedure now:
1) Run command prompt (cmd). This can be done by clicking start and typing typing cmd in Windows 7. In Windows Xp, click on start and then click on run. Type cmd and run. This will open the command prompt which will look like this:
2) Then run diskpart utility from command prompt, by typing ‘diskpart’ on command prompt and pressing enter. This will run the diskpart utility in a separate windows, which is shown in 2nd picture below:
3) Now put in your pendrive in a USB port. Your pen drive must be atleast 4 GB, 8 GB pendrive is best for this purpose. Now go back to the diskpart console and type ‘listdisk’ and press enter. This will list the various storage devices available. You can see the size column of the disk and here we can see that ‘disk 2′ is our pen drive. Warning: In your computer it may be some other number. In our case it is ‘disk 2′.
4) Then you have to type ‘select disk 2′ and press enter. Note: in our case it is disk 2, in your case it may be disk 3, or disk 1 or any other number. You can enter ‘detail disk’ to see the details of the disk after selecting it to verify that you have selected the correct disk. You can see these steps in the image below:

5) Then you have to run a series of commands. The commands to be run in the order are:- clean
- create partition primary
- select partition 1
- active
- format fs=fat32
These steps are shown in the image below:
6) The format step will take some time. You can have a tea or coffee in the meantime and come back. After the format is complete you have to run ‘assign’ command. And after this you can exit diskpart utility by entering the ‘exit’ command. The steps are shown below:
- assign
- exit
- The image below shows all the steps taken from the first step:
7) After the format is complete, put in your original Windows 7 DVD in your DVD drive, or if you have an .iso image of the DVD, mount that image using any virtual drive software like Power ISO.
- Now go to My Computer, and open the contents of DVD Drive. Press ‘ctrl+a’ to select all contents and copy all the contents by pressing ‘ctrl+c’.
- Now go back to My Computer and open the USB Drive and press ‘ctrl+v’ to paste all the contents of DVD into the USB Disk.

8) When the copy finishes, you are done just remove the USB Drive safely and use it to install Windows 7 in your computer/laptop.

We hope this post will help you.
Thanks