Friday 27 April 2012
Friday 20 April 2012
How to Hack Softwares to use them Forever
Here i will show you that "How to Hack Softwares to use them Forever ?" . That really a useful article,because in our daily life we need thousand of softwares today,which of most are highly paid..So how to use them Freely for whole Like ??
Most of us are familiar with many softwares that run only for a specified period of time in the trial mode.Once the trial period is expired these softwares stop functioning and demand for a purchase.But there is a way to run the softwares and make them function beyond the trial period. Isn’t this interesting?
Before I tell you how to hack the software and make it run in the trial mode forever, we have to understand the functioning of these softwares.I’ll try to explain this in brief.Because Purpose if ICA is 1st to clear your basics.So,When these softwares are installed for the first time, they make an entry into the Windows Registry with the details such as Installed Date and Time, installed path etc.After installation every time you run the software, it compares the current system date and time with the installed date and time.So, with this it can make out whether the trial period is expired or not.
So with this being the case, just manually changing the system date to an earlier date will not solve the problem.For this purpose there is a small Tool known as RunAsDate.
RunAsDate is a small utility that allows you to run a program in the date and time that you specify. This utility doesn’t change the current system date, but it only injects the date/time that you specify into the desired application.

Download RunAsDate v1.10
Intercepts the kernel API calls that returns the current date and time (GetSystemTime, GetLocalTime, GetSystemTimeAsFileTime), and replaces the current date/time with the date/time that you specify.It works with Windows 2000, XP, 2003 and Vista.
NOTE: FOLLOW THESE TIPS CAREFULLY
You have to follow these tips carefully to successfully hack a software and make it run in it’s trial mode forever.
1. Note down the date and time, when you install the software for the first time.
2. Once the trial period expires, you must always run the software using RunAsDate .
3. After the trial period is expired, do not run the software(program) directly.If you run the software directly even once, this hack may no longer work.
4. It is better and safe to inject the date of the last day in the trial period.
For example, if the trial period expires on oct 1 2009, always inject the date as sep 30 2009 in the RunAsDate.
Warning : AVG Antivirus reports that RunAsDate is infected with "Trojan horse Generic 10.Thk". This will not harm ur pc,warning is just bcoz this is a wondow registry hack tool !
HOW TO IDENTIFY FAKE EMAILS:-
HOW TO IDENTIFY FAKE EMAILS:-

Hello friends, Daily we got almost 100's of face emails ,Like in spam folder. A php script can mail you from any email address...Even from your own email address..So How To Identify the Fake E-mail ID.Here a small guide i am going to share with my all ICA Visitors. If you like the article,then please do a comment..,At present it is difficult to identify the fake ID. With time more and more people are using the fake IDs which creates a bunch of trouble to thousands of people. So here detection of those fake IDs has become almost a necessity. It is also important because hackers are always looking to use the fake email IDs to get the personal information of victims.
There are several techniques to identify the fake e-mail IDs. The common method you can use is to send test mail to those IDs. If you got failure notification then its a fake email IDs. Alternatively there is couple of web service which identify the fake e-mail IDs for the users.
Email Address Checker:
Email Address Checker is well known email IDs checker which identify the the validity of any kind of emails IDs. All you need to do is type the email IDs in the box and press ‘Check’ button. Within a moment it displays the validity of email IDs.
CLICK HERE
TYPES OF COMPUTER ERROR
Blue Screen Computer Freeze
Computer freezing is a very common problem faced by users where the computer suddenly hangs, reboots, or just shuts itself down. This is a big concern as it may lead to data loss and other problems. This is a common problem everyone face and so we should know how to fix it and prevent it from occurring another time. It is mainly caused due to the corruption of the registry files which are important files that help in the running of the computed. Any fault in these files can lead to a mess up which leads to the crashing of the computer. There are many different causes that lead to the freezing of the computer. The access files in the computer are used for the storage of large amount of data. If any altering of the access files occurs then the whole program will be affected. When a person is browsing through the internet they will collect huge amount of information and data which may have some errors or malicious information. This may corrupt the registry files of the operating system and lead to computer freezing. These files are unwanted and they should be removed from the computer to avoid the corruption of files and to prevent any damage.
Users should repair the registry files by either deleting or repairing the files. This can be done with the help of scan programs that will automatically clean up the unwanted files and repair and quarantine the required files. These programs will help in creating a back up file that will help in tracing the data and prevent any loss of information. Registry fix is a risk free program and it will not damage the files of the computer. All users should install the scan software before they encounter any problems of data loss. This is the best way to fix the registry file problems and helps in solving the errors which help in the proper functioning of the computer. It will help in providing optimum efficiency to the computer. Always use antivirus software for your computer and keep updating it from the website of the manufacturers. Install good spyware tools to the computer and keep away all the harmful spyware that may affect your computer.
It is important to leave some space in your computer and don’t fill it up full. The drive in which the windows is installed should have some free space. If the system has low resources then you should go for a disk clean up which will help in removing all the unwanted files that are present in the computer. The computer should be constantly checked for overheating. Overheating is one of the reasons for computer freezing. If the fan in the processor does not work properly then it may lead to overheating. In this case the motherboard will get damaged and the computer will suffer problems. These things should be checked constantly when using a computer and you will be able to prevent computer freezing. It is always said that prevention is better than cure so keep the computer in good shape to get the best out of it.
How to Quickly Fix Computer Freezes
Bottom line is that anytime your computer freezes it is a bad thing and something is broken with your computer that needs fixed immediately without causing costly damage to your computer. We recommend that you run a free scan of your computer to find all of the hidden errors that is causing your computer to freeze. Don’t let these errors slow down your computer causing you to pull your hair out in frustration. Not taking action to clean up your computer can cause $100’s of dollars not including countless hours of lost productivity. Remove every error and experience a flawless running, super fast PC just like it was when you first bought it. The great news is that all of this can be done by performing a Free Scan of your computer and in less than 2 minutes you can take care of the problem.
Error 1706
Error 1706 is referred to as a Microsoft Office Error message which generates when installing any Windows program. This error indicates that these required files are not found in your setup. Sometimes the text for Error 1706 includes the phrases like “no source can be found” on your computer screen. This type of error occurs due to few reasons which include either you originally install Microsoft program from the network administration, you are trying Microsoft CD-ROM when you are restricted by the Windows Installer for exact location or the network administration is not available in your system. In these cases the Microsoft reports that Office XP and MS Office 2003 setup have some problem.
This kind of problem can also occur when you posses an unlicensed version of MS Office 2003 or you have not yet registered it. It can also occur due to the Group Policy setting on your personal computer which prevents access to the installation files. There are many other reasons why this kind of problem and the simplest problem can be that the DVD-ROM or CD-ROM may be having difficulty reading the disk and perhaps require to be cleaned. At times it can be a serious problem with Windows Installer or Registry program. So, check and ensure that CD or DVD-ROM which you are installing or even updating is original and that both the disks and clean. Error 1706 can have several serious possible causes.
One of the files may be needed by the application can have been deleted and this may lead to this kind of error. This can happen if you have installed different kind of program and it did not read the existing files. In order to find out what are the files which are missing from your application you have to analyze all your logs and see which path that is labeled is not available. As you find the file name then you can find a particular file by utilizing the search feature that is located on the start menu. However, if nothing is the result of your search then you can reinstall that program. A PC optimizer or registry cleaner such as RegCure can sort out the registry and decide if there are ay conflicts in the system.
If this is the case then this problem must be fixed immediately by scanning the RegCure scanner and see if there is any error which has led to this kind of error messages. To fix this problem other than re-installing or uninstalling your Microsoft will certainly need the registry to be edited. This at times can be dangerous if you do not understand exactly what it is. At the most you would require to have a backup as any mistake in editing by using the start or run process can cause complicated failures and your entire information may e lost. There are times when you get some strange error messages when you are about to install some programs with limited freedom or without license. If you do not understand what to do to solve this problem it is better to consult a professional who can solve your problem.
How to Quickly Fix 1706 Errors
Bottom line with any of these 1706 errors is that you want them removed from your computer immediately without causing costly damage to your computer. We recommend that you run a free scan of your computer to find all of the hidden errors. Don’t let these errors slow down your computer causing you to pull your hair out in frustration. Not taking action to clean up your computer can cause $100’s of dollars not including countless hours of lost productivity. Remove every 1706 error and experience a flawless running, super fast PC just like it was when you first bought it. The great news is that all of this can be done by performing a Free Scan of your computer and in less than 2 minutes you can take care of the problem.
Error 2753
For several users, ‘error messages’ can prove of being confusing and frightening, as they don’t know the problems or the happenings with regards to their system. It should be noted that error 2753 is nothing but one of the internal errors, at times concerned with Norton anti virus or Dell Support programs. Besides, problems arising due to this error might result in termination of application process by your computer. The computer might also crash, or repeatedly try re-booting. It can also quit completely. Error 2753 can be commonly observed after a ‘system problem’, i.e. when the system’s recovery has been done and installation of missing programs takes place again.
Reasons behind occurrence of error 2753
One of the most probable reasons behind occurrence of error 2753 might be that certain age-old file fragments, that too, from missing program still exist in your system’s registry. Such a thing is likely of causing your computer of experiencing errors and having problems, inclusive of error 2753. Most of the programs, with issue of this kind, make no mistake in stating that no problems persist. having run a ‘virus scan’ wouldn’t reveal any sort of malicious software. Moreover, a ‘spyware scan’ would make way for negative results. Apart from all this, you need to know that Firewall doesn’t recognize any of the problems. However, your system would, by all means, experience some error message. This error message would be nothing but ‘Error 2753’.
After having checked each and every security program and found nothing, you might get tempted for throwing in towel. You might also lose your temper to the extent of throwing the machine out of the window; but wait! Do not lose hope. You can easily have your problems solved by resorting to various methods like editing of Windows Registry. As such, Windows Registry cannot be left haywire, as it is the prime component with regards to having held operating files of your system. If you do not take care on this count, changing any of the entries in registry would prove to be highly risky.
Computer wizards find detection of error messages a cake-walk. However, let it be known that such a task is not all that easy. It’s, in fact, extremely troublesome. The basic reason behind occurrence of error 2753 is carelessness on your part. If you are meticulous in terms of having handled your PC, there would be nothing like error 2753 in to existence.
Computers have performed the task of greatly simplifying our lives. They have, however, brought loads of complexity in this regard, that too, in such a way that no one had ever thought of before. These days, people have started relying on internet connection and computers for literally anything. In fact, certain people consider using computer even for minute operations as a status symbol. There are people who prefer hanging out with friends or going for a long walk as being a better way of warming up themselves. However, such people are looked down upon. So, if you wish to be a computer buff, be prepared to withstand errors like ‘error 2753’.
How to Quickly Fix 2753 Errors
Bottom line with any of these 2753 errors is that you want them removed from your computer immediately without causing costly damage to your computer. We recommend that you run a free scan of your computer to find all of the hidden errors. Don’t let these errors slow down your computer causing you to pull your hair out in frustration. Not taking action to clean up your computer can cause $100’s of dollars not including countless hours of lost productivity. Remove every 2753 error and experience a flawless running, super fast PC just like it was when you first bought it. The great news is that all of this can be done by performing a Free Scan of your computer and in less than 2 minutes you can take care of the problem.
Thursday 19 April 2012
How to make Bootable Windows XP PenDrive
How to make Bootable Windows XP PenDrive
Boot from USB is more faster than boot from CD Drive. You can easily install Windows XP from a Pen drive by making your Pen Drive Bootable. Here is the process to make Bootable Pen Drive.
To make bootable windows xp pendrive please visitwww.emdadblog.com From now I am available to this site and you will get all the replay and update blog post at this site. This blog site emdadblog.blogspot.com will no longer be updated.
Thanks
EmdadUnzip the file after downloading- A folder will be created as "USB-Multiboot_10"
- Now insert your minimum 1 GB pen drive into USB port
Note : Make sure that you have Backup your data from Pen drive. Because yourPen Drive will be formatted during making bootable pen drive process.Now follow this steps :Owner Name = emdadblog (Your Name)
- Open USB_Multiboot_10.cmd from USB_multiboot_10 folder
- Press any key to Continue... A message will be appear. Press ENTER
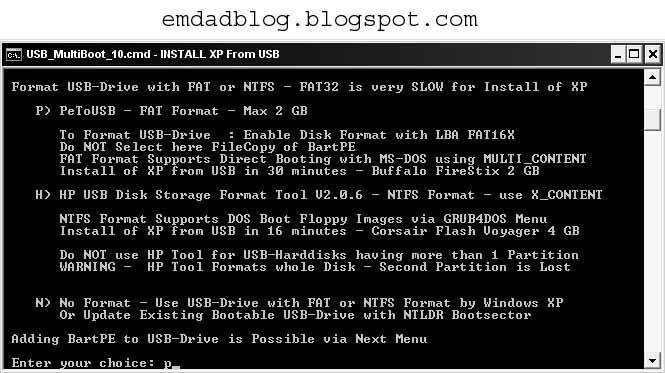
- From Enter your choice : type P and press ENTER
- Now Pen derive format option will come and format your pen drive. See below pictures...

Bootable Windows Xp Pendrive


Bootable Windows Xp Pendrive
Bootable Windows Xp Pendrive


Bootable Windows Xp Pendrive
Bootable Windows Xp Pendrive

Bootable Windows Xp Pendrive

Bootable Windows Xp Pendrive
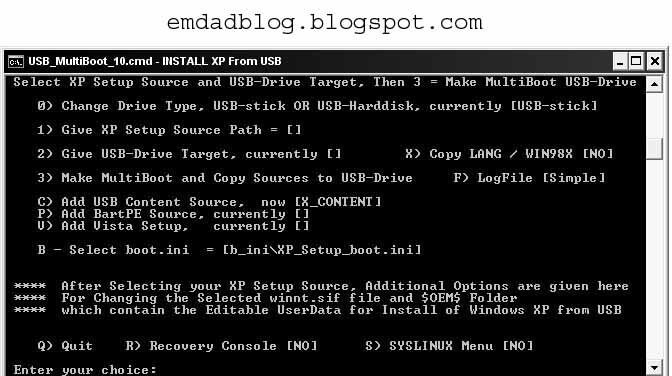
- Now insert your XP CD in your CD Rom
- Type 1 and press ENTER in Enter your choice
- Locate the XP CD installation Disk
- Choose YES when unattended install option appear
Now insert the below information on by one and press OK- Organization Name = Emdadblog(Your Name)
- Product Key = XXXXX-XXXXX-XXXXX-XXXXX-XXXXX(your Xp serial Key)
- Computer Name = Emdadblog(your computer name)
- Administrator Password = XXXX(Your password)
- Time Zone = Your time zone
- Workgroup Name = Emdadblog(Your name)
- User Name = Emdadblog(Your name)


Now press OK
In many computer during the installation process after restarting first time a error hall.dll will come. In this situation to boot from pen drive choose "2.and 3. Continue with GUI mode setup Widnows XP + Start XP from HD 1" from boot menu option and press ENTER
- Type 2 and press ENTER in choice 2
- Now locate your pen drive location
- Type 3 and press enter
- Now the process will continue to make bootable XP Pen drive
In many computer during the installation process after restarting first time a error hall.dll will come. In this situation to boot from pen drive choose "2.and 3. Continue with GUI mode setup Widnows XP + Start XP from HD 1" from boot menu option and press ENTER
How to make Windows 7 Bootable USB Pendrive
How to make Windows 7 Bootable USB Pendrive
Hello,
Many of us face a lot of problem when we have to reinstall windows on our computer or laptop. First thing we have to decide from where to install windows? The options available are DVD or USB Pendrive. In the latest new netbooks, mostly there is no DVD drive. So if you want to install windows you have to go with the other option, i.e. USB Pendrive. So here I give a brief and 100% tested tutorial on how to create a Windows 7 Bootable USB Pendrive to install Windows 7 from USB Pendrive.
First thing, you should check whether your BIOS supports booting from USB. Most of the computer/laptops support. But if your BIOS doesn’t, then sorry, you cannot boot from a USB Pendrive.
Second thing, you need another computer with Windows installed with a DVD drive, to copy its contents later.
So let us start with the procedure now:
1) Run command prompt (cmd). This can be done by clicking start and typing typing cmd in Windows 7. In Windows Xp, click on start and then click on run. Type cmd and run. This will open the command prompt which will look like this:

2) Then run diskpart utility from command prompt, by typing ‘diskpart’ on command prompt and pressing enter. This will run the diskpart utility in a separate windows, which is shown in 2nd picture below:


3) Now put in your pendrive in a USB port. Your pen drive must be atleast 4 GB, 8 GB pendrive is best for this purpose. Now go back to the diskpart console and type ‘listdisk’ and press enter. This will list the various storage devices available. You can see the size column of the disk and here we can see that ‘disk 2′ is our pen drive. Warning: In your computer it may be some other number. In our case it is ‘disk 2′.

4) Then you have to type ‘select disk 2′ and press enter. Note: in our case it is disk 2, in your case it may be disk 3, or disk 1 or any other number. You can enter ‘detail disk’ to see the details of the disk after selecting it to verify that you have selected the correct disk. You can see these steps in the image below:

5) Then you have to run a series of commands. The commands to be run in the order are:- clean
- create partition primary
- select partition 1
- active
- format fs=fat32
These steps are shown in the image below:

6) The format step will take some time. You can have a tea or coffee in the meantime and come back. After the format is complete you have to run ‘assign’ command. And after this you can exit diskpart utility by entering the ‘exit’ command. The steps are shown below:
- assign
- exit

- The image below shows all the steps taken from the first step:

7) After the format is complete, put in your original Windows 7 DVD in your DVD drive, or if you have an .iso image of the DVD, mount that image using any virtual drive software like Power ISO.
- Now go to My Computer, and open the contents of DVD Drive. Press ‘ctrl+a’ to select all contents and copy all the contents by pressing ‘ctrl+c’.
- Now go back to My Computer and open the USB Drive and press ‘ctrl+v’ to paste all the contents of DVD into the USB Disk.
We hope this post will help you.
Thanks
Networking hardware
Networking hardware or simply Networking equipment typically refers to devices facilitating the use of a computer network. Typically, this includes gateways, routers, network bridges, switches, hubs, and repeaters. Also, hybrid network devices such as multilayer switches, protocol converters and bridge routers. And, proxy servers, firewalls and network address translators. Also, multiplexers, network interface controllers, wireless network interface controllers, modems, ISDN terminal adapters and line drivers. And, wireless access points, networking cables and other related hardware.
Computer networking devices are units that mediate data in a computer network.[1][2] Computer networking devices are also called network equipment, Intermediate Systems (IS)[citation needed] or InterWorking Unit (IWU).[citation needed] Units which are the last receiver or generate data are called hosts or data terminal equipment.[citation needed]
The most common kind of networking hardware today is copper-based Ethernet adapters, helped largely by its standard inclusion on most modern computer systems. Wireless networking has become increasingly popular, however, especially for portable and handheld devices.
Other hardware prevalent within computer networking is datacenter equipment (such as file servers, database servers and storage areas), network services (such as DNS, DHCP, email etc) as well as other specific network devices such as content delivery.
Other diverse devices which may be considered networking hardware include mobile phones, PDAs and even modern coffee machines. As technology grows and IP-based networks are integrated into building infrastructure and household utilities, network hardware becomes an ambiguous statement owing to the increasing number of "network capable" endpoints.List of computer networking devices
- Gateway: device sitting at a network node for interfacing with another network that uses different protocols. Works on OSI layers 4 to 7.
- Router: a specialized network device that determines the next network point to which it can forward a data packet towards the destination of the packet. Unlike a gateway, it cannot interface different protocols. Works on OSI layer 3.
- Bridge: a device that connects multiple network segments along the data link layer. Works on OSI layer 2.
- Switch: a device that allocates traffic from one network segment to certain lines (intended destination(s)) which connect the segment to another network segment. So unlike a hub a switch splits the network traffic and sends it to different destinations rather than to all systems on the network. Works on OSI layer 2.
- Hub: connects multiple Ethernet segments together making them act as a single segment. When using a hub, every attached device shares the same broadcast domain and the same collision domain. Therefore, only one computer connected to the hub is able to transmit at a time. Depending on the network topology, the hub provides a basic level 1 OSI model connection among the network objects (workstations, servers, etc.). It provides bandwidth which is shared among all the objects, compared to switches, which provide a dedicated connection between individual nodes. Works on OSI layer 1.
- Repeater: device to amplify or regenerate digital signals received while sending them from one part of a network into another. Works on OSI layer 1.
- Multilayer switch: a switch which, in addition to switching on OSI layer 2, provides functionality at higher protocol layers.
- Protocol converter: a hardware device that converts between two different types of transmissions, such as asynchronous and synchronous transmissions.
- Bridge router (brouter): a device that combines router and bridge functionality and therefore works on OSI layers 2 and 3.
- Proxy server: computer network service which allows clients to make indirect network connections to other network services
- Firewall: a piece of hardware or software put on the network to prevent some communications forbidden by the network policy
- Network address translator (NAT): network service provide as hardware or software that converts internal to external network addresses and vice versa
- Multiplexer: device that combines several electrical signals into a single signal
- Network interface controller a piece of computer hardware to allow the attached computer to communicate by network
- Wireless network interface controller a piece of computer hardware to allow the attached computer to communicate by LAN
- Modem: device that modulates an analog "carrier" signal (such as sound), to encode digital information, and that also demodulates such a carrier signal to decode the transmitted information, as a computer communicating with another computer over the telephone network
- ISDN terminal adapter (TA): a specialized gateway for ISDN
- Line driver: a device to increase transmission distance by amplifying the signal. Base-band networks only.
All About IP -The first step in hacking...
All About IP -The first step in hacking...

In here I have figure out some very easy but cool ways to trace out the geographical location and various other infos like ISP details etc of a remote computer using its IP(Internet Protocol).
Well I guess its one of the most important must learn manual for boys out there if you want to impress your friends particularly gals whom you'll meet online in a chat room and tell them their geographical locations and ISP details and make them surprised and impressed .
In the practical execution of this manual you don't have to work much as it is very simple only you have to use your brain to understand some symbols and some format of expressions and use your IQ to execute things the right way.
What is IP and how to get the IP of a remote system::
Getting the IP or Internet Protocol of a remote system is the most important and the first step of hacking into it. Probably it is the first thing a hacker do to get info for researching on a system. Well IP is a unique number assigned to each computer on a network. It is this unique address which represents the system on the network. Generally the IP of a particular system changes each time you log on to the network by dialing to your ISP and it is assigned to you by your ISP. IP of a system which is always on the network remains generally the same. Generally those kind of systems are most likely to suffer a hacking attack because of its stable IP. Using IP you can even execute system commands on the victim's computer.
Lets take the example of the followingIP address : 202.144.49.110 Now the first part, the numbers before the first decimal i.e. 209 is the Network number or the Network Prefix.. This means that it identifies the number of the network in which the host is. The second part i.e. 144 is the Host Number that is it identifies the number of the host within the Network. This means that in the same Network, the network number is same. In order to provide flexibility in the size of the Network, here are different classes of IP addresses:
Address Class Dotted Decimal Notation Ranges
Class A ( /8 Prefixes) 1.xxx.xxx.xxx through 126.xxx.xxx.xxx
Class B ( /16 Prefixes) 128.0.xxx.xxx through 191.255.xxx.xxx
Class C ( /24 Prefixes) 192.0.0.xxx through 223.255.255.xxx
The various classes will be clearer after reading the next few lines.
Each Class A Network Address contains a 8 bit Network Prefix followed by a 24-bit host number. They are considered to be primitive. They are referred to as "/8''s" or just "8's" as they have an 8-bit Network prefix.
In a Class B Network Address there is a 16 bit Network Prefix followed by a 16-bit Host number. It is referred to as "16's".
A class C Network address contains a 24-bit Network Prefix and a 8 bit Host number. It is referred to as
"24's" and is commonly used by most ISP's.
Due to the growing size of the Internet the Network Administrators faced many problems. The Internet routing tables were beginning to grow and now the administrators had to request another network number from the Internet before a new network could be installed at their site. This is where sub-netting came in.
Now if your ISP is a big one and if it provides you with dynamic IP addresses then you will most probably see that whenever you log on to the net, your IP address will have the same first 24 bits and only the last 8 bits will keep changing. This is due to the fact that when sub-netting comes in then the IP Addresses structure becomes:
xxx.xxx.zzz.yyy
where the first 2 parts are Network Prefix numbers and the zzz is the Subnet number and the yyy is the host number. So you are always connected to the same Subnet within the same Network. As a result the first 3 parts will remain the same and only the last part i.e. yyy is variable.
***********************
For Example, if say an ISP xyz is given the IP: 203.98.12.xx Network address then you can be awarded any IP, whose first three fields are 203.98.12. Get it?
So, basically this means that each ISP has a particular range in which to allocate all its subscribers. Or in other words, all subscribers or all people connected to the internet using the same ISP, will have to be in this range. This in effect would mean that all people using the same ISP are likely to have the same first three fields of their IP Addresses.
This means that if you have done a lot of (By this I really mean a lot) of research, then you could figure out which ISP a person is using by simply looking at his IP. The ISP name could then be used to figure out the city and the country of the person. Right? Let me take an example to stress as to how cumbersome but easy (once the research is done) the above method can be.
In my country, say there are three main ISPs:
ISP Name Network Address Allotted
ISP I 203.94.47.xx
ISP II 202.92.12.xx
ISP III 203.91.35.xx
Now, if I get to know the IP of an e-pal of mine, and it reads: 203.91.35.12, then I can pretty easily figure out that he uses ISP III to connect to the internet. Right? You might say that any idiot would be able to do this. Well, yes and no. You see, the above method of finding out the ISP of a person was successful only because we already had the ISP and Network Address Allotted list with us. So, what my point is, that the above method can be successful only after a lot of research and experimentation. And, I do think such research can be helpful sometimes.
Also, this would not work, if you take it all on in larger scale. What if the IP that you have belongs to someone living in a remote igloo in the North Pole? You could not possibly get the Network Addresses of all the ISPs in the world, could you? If yes please send it to me J.
Well now I guess you have pretty good knowledge about what an IP is and what you can do by knowing the IP of a remote system. Now lets come to the point of finding out the IP of remote system.
Well you can easily figure out the IP of a remote system using thenetstat utility available in the microsoft's version of DOS. The netstat command shows the connections in which your system is engaged to and the ports they are using. Suppose you are checking your mail in hotmail and you want to find out the IP of msn. All you need to do is to open a dos window (command.com) and type netstat. You will see all the open connections of your system. There you will see something :
Proto Local Address Foreign Address State
TCP RAJ:1031 64.4.xx.xx:80 ESTABLISHED
Now you got the IP address of hotmail ass 64.4.xx.xx .
Similarly you can figure out the IP address of most http or ftp connections.
To know your own IP type the following command in a dos windows
C:\netstat -n
[this commands converts the IP name into IP addresses]
this is what you will probably see on typing the above command :
Proto Local Address Foreign Address State
TCP 203.xx.251.161:1031 194.1.129.227:21 ESTABLISHED
TCP 203.xx.251.161:1043 207.138.41.181:80 FIN_WAIT_2
TCP 203.xx.251.161:1053 203.94.243.71:110 TIME_WAIT
TCP 203.xx.251.161:1058 194.1.129.227:20 TIME_WAIT
TCP 203.xx.251.161:1069 203.94.243.71:110 TIME_WAIT
TCP 203.xx.251.161:1071 194.98.93.244:80 ESTABLISHED
TCP 203.xx.251.161:1078 203.94.243.71:110 TIME_WAIT
Here 203.xx.251.161 is your IP address.
Now lets clarify the format used by netstat :
Proto : It shows the type of protocol the connection with the remote system is using.
Here TCP (transmission control protocol) is the protocol used by my system to connect to other systems.
Local Address :
It shows the local address ie the local IP. When the netstat command is executed without 'n' switch then the name of the local system is displayed and when the netstat is executed with 'n' switch then the IP of the local system is displayed. Here you can also find out the port used by the connection.
xxx.yyy.zzz.aaa:1024
in this format you will see the local address. Here 1024 is the port to which the remote system is connected in your system
Foreign Address ::
It shows the IP address of the remote system to which your system is connected. In this case also if the netstat command is excuted with 'n' switch then you directly get the IP of the victim but if the netstat is executed without 'n' switch then you will get the address of the remote system. Something like
C:\netstat
Proto Local Address Foreign Address State
TCP abhisek:1031 msgr.lw4.gs681.hotmail.com:80 ESTABLISHED
Here msgr.lw4.gs681.hotmail.com is the address of the foreign system . putting this address in any IP lookup program and doing a whois lookup will reveal the IP of the remote system.
Note: The port to which your system is connected can be found from this in the same way as I have shown in the case of local address. The difference is that, this is the port of the remote system to which your computer is connected to.
Below I have produced a list of ports and popular services generally found to be running.
21 :: FTP port
80 :: http port
23 :: Telnet port
Note: If your execute the netstat command and find ports like 12345,27374 are open and are in use then make it sure that your sweat heart computer is infected with her boyfriend.. J J J J I mean your computer is infected with some sort of Trojan.
Below I have produced a list of commonly known Trojans and the ports they use by default. So if you find these ports open then get a good virus buster and get these stupid servers of the Trojans kicked out. Well if you want to play with these Trojan by keeping them in your computer but not letting them ruin your system performance then just disble it from the system registry run and they wont be loaded to memory each time when windows starts up[This trick doesn't work for all Trojans].
Netbus :: 12345(TCP)
Subseven :: 27374(TCP)
Girl Friend :: 21554(TCP)
Back Oriface :: 31337 (UDP)
Well guys and gals I hope you are now well familiar with the term IP and what is the utility of IP in cyber world and how to get the IP of a remote system to which you are connected. I hope you find my writings very easy to undertstand. I know I lack the capacity of explaining myself but I try my level best to make things very easy and clear for you all.
How to get the IP of a remote system while chatting throughmsn messenger ::
This is a tutorial on how to get IP address from MSN messenger. This is actually
a really easy thing to do. It is not like going through the hard time and reversing
MSN messenger like many people think.
The IP address is only given when you accept or are sending a file through MSN
messenger. When you send IM's, the message is sent through the server thus hiding
your victims IP and your. But when you send a file or recieve a file, it is direct
connection between the two computers.
To obtain the IP accept a file transfer or send a file to the victim, when the file
sending is under way from the dos prompt type "netstat" without the quotation marks.
You should get a table like this:
Proto Local Address Foreign Address State
TCP kick:1033 msgr-ns29.msgr.hotmail.com:1863 ESTABLISHED
TCP kick:1040 msgr-sb36.msgr.hotmail.com:1863 ESTABLISHED
TCP kick: ESTABLISHED
The top name in the list is the server's address for IMing. There could be many of
the second name in the list, as a new connection is made to the server for every
room you are IMing to. You are looking for the address of the remote host in
this table it may be something similar to "host63-7-102-226.ppp.cal.vsnl.com" or “203..64.90.6�.
without the quotation marks.
All you need to do now is to put this address in you IP lookup programe and get the IP of the remote system.
So dudes...I hope this is helpful for you...
Well I guess its one of the most important must learn manual for boys out there if you want to impress your friends particularly gals whom you'll meet online in a chat room and tell them their geographical locations and ISP details and make them surprised and impressed .
In the practical execution of this manual you don't have to work much as it is very simple only you have to use your brain to understand some symbols and some format of expressions and use your IQ to execute things the right way.
What is IP and how to get the IP of a remote system::
Getting the IP or Internet Protocol of a remote system is the most important and the first step of hacking into it. Probably it is the first thing a hacker do to get info for researching on a system. Well IP is a unique number assigned to each computer on a network. It is this unique address which represents the system on the network. Generally the IP of a particular system changes each time you log on to the network by dialing to your ISP and it is assigned to you by your ISP. IP of a system which is always on the network remains generally the same. Generally those kind of systems are most likely to suffer a hacking attack because of its stable IP. Using IP you can even execute system commands on the victim's computer.
Lets take the example of the following
Address Class Dotted Decimal Notation Ranges
Class A ( /8 Prefixes) 1.xxx.xxx.xxx through 126.xxx.xxx.xxx
Class B ( /16 Prefixes) 128.0.xxx.xxx through 191.255.xxx.xxx
Class C ( /24 Prefixes) 192.0.0.xxx through 223.255.255.xxx
The various classes will be clearer after reading the next few lines.
Each Class A Network Address contains a 8 bit Network Prefix followed by a 24-bit host number. They are considered to be primitive. They are referred to as "/8''s" or just "8's" as they have an 8-bit Network prefix.
In a Class B Network Address there is a 16 bit Network Prefix followed by a 16-bit Host number. It is referred to as "16's".
A class C Network address contains a 24-bit Network Prefix and a 8 bit Host number. It is referred to as
"24's" and is commonly used by most ISP's.
Due to the growing size of the Internet the Network Administrators faced many problems. The Internet routing tables were beginning to grow and now the administrators had to request another network number from the Internet before a new network could be installed at their site. This is where sub-netting came in.
Now if your ISP is a big one and if it provides you with dynamic IP addresses then you will most probably see that whenever you log on to the net, your IP address will have the same first 24 bits and only the last 8 bits will keep changing. This is due to the fact that when sub-netting comes in then the IP Addresses structure becomes:
xxx.xxx.zzz.yyy
where the first 2 parts are Network Prefix numbers and the zzz is the Subnet number and the yyy is the host number. So you are always connected to the same Subnet within the same Network. As a result the first 3 parts will remain the same and only the last part i.e. yyy is variable.
***********************
For Example, if say an ISP xyz is given the IP: 203.98.12.xx Network address then you can be awarded any IP, whose first three fields are 203.98.12. Get it?
So, basically this means that each ISP has a particular range in which to allocate all its subscribers. Or in other words, all subscribers or all people connected to the internet using the same ISP, will have to be in this range. This in effect would mean that all people using the same ISP are likely to have the same first three fields of their IP Addresses.
This means that if you have done a lot of (By this I really mean a lot) of research, then you could figure out which ISP a person is using by simply looking at his IP. The ISP name could then be used to figure out the city and the country of the person. Right? Let me take an example to stress as to how cumbersome but easy (once the research is done) the above method can be.
In my country, say there are three main ISPs:
ISP Name Network Address Allotted
ISP I 203.94.47.xx
ISP II 202.92.12.xx
ISP III 203.91.35.xx
Now, if I get to know the IP of an e-pal of mine, and it reads: 203.91.35.12, then I can pretty easily figure out that he uses ISP III to connect to the internet. Right? You might say that any idiot would be able to do this. Well, yes and no. You see, the above method of finding out the ISP of a person was successful only because we already had the ISP and Network Address Allotted list with us. So, what my point is, that the above method can be successful only after a lot of research and experimentation. And, I do think such research can be helpful sometimes.
Also, this would not work, if you take it all on in larger scale. What if the IP that you have belongs to someone living in a remote igloo in the North Pole? You could not possibly get the Network Addresses of all the ISPs in the world, could you? If yes please send it to me J.
Well now I guess you have pretty good knowledge about what an IP is and what you can do by knowing the IP of a remote system. Now lets come to the point of finding out the IP of remote system.
Well you can easily figure out the IP of a remote system using the
Proto Local Address Foreign Address State
Now you got the IP address of hotmail ass 64.4.xx.xx .
Similarly you can figure out the IP address of most http or ftp connections.
To know your own IP type the following command in a dos windows
C:\netstat -n
[this commands converts the IP name into IP addresses]
this is what you will probably see on typing the above command :
Proto Local Address Foreign Address State
TCP 203.xx.251.161:1031 194.1.129.227:21 ESTABLISHED
TCP 203.xx.251.161:1043 207.138.41.181:80 FIN_WAIT_2
TCP 203.xx.251.161:1053 203.94.243.71:110 TIME_WAIT
TCP 203.xx.251.161:1058 194.1.129.227:20 TIME_WAIT
TCP 203.xx.251.161:1069 203.94.243.71:110 TIME_WAIT
TCP 203.xx.251.161:1071 194.98.93.244:80 ESTABLISHED
TCP 203.xx.251.161:1078 203.94.243.71:110 TIME_WAIT
Here 203.xx.251.161 is your IP address.
Now lets clarify the format used by netstat :
Proto : It shows the type of protocol the connection with the remote system is using.
Here TCP (transmission control protocol) is the protocol used by my system to connect to other systems.
Local Address :
It shows the local address ie the local IP. When the netstat command is executed without 'n' switch then the name of the local system is displayed and when the netstat is executed with 'n' switch then the IP of the local system is displayed. Here you can also find out the port used by the connection.
xxx.yyy.zzz.aaa:1024
in this format you will see the local address. Here 1024 is the port to which the remote system is connected in your system
Foreign Address ::
It shows the IP address of the remote system to which your system is connected. In this case also if the netstat command is excuted with 'n' switch then you directly get the IP of the victim but if the netstat is executed without 'n' switch then you will get the address of the remote system. Something like
C:\netstat
Proto Local Address Foreign Address State
TCP abhisek:1031 msgr.lw4.gs681.hotmail.com:80 ESTABLISHED
Here msgr.lw4.gs681.hotmail.com is the address of the foreign system . putting this address in any IP lookup program and doing a whois lookup will reveal the IP of the remote system.
Note: The port to which your system is connected can be found from this in the same way as I have shown in the case of local address. The difference is that, this is the port of the remote system to which your computer is connected to.
Below I have produced a list of ports and popular services generally found to be running.
21 :: FTP port
80 :: http port
23 :: Telnet port
Note: If your execute the netstat command and find ports like 12345,27374 are open and are in use then make it sure that your sweat heart computer is infected with her boyfriend.. J J J J I mean your computer is infected with some sort of Trojan.
Below I have produced a list of commonly known Trojans and the ports they use by default. So if you find these ports open then get a good virus buster and get these stupid servers of the Trojans kicked out. Well if you want to play with these Trojan by keeping them in your computer but not letting them ruin your system performance then just disble it from the system registry run and they wont be loaded to memory each time when windows starts up[This trick doesn't work for all Trojans].
Netbus :: 12345(TCP)
Subseven :: 27374(TCP)
Girl Friend :: 21554(TCP)
Back Oriface :: 31337 (UDP)
Well guys and gals I hope you are now well familiar with the term IP and what is the utility of IP in cyber world and how to get the IP of a remote system to which you are connected. I hope you find my writings very easy to undertstand. I know I lack the capacity of explaining myself but I try my level best to make things very easy and clear for you all.
How to get the IP of a remote system while chatting through
This is a tutorial on how to get IP address from MSN messenger. This is actually
a really easy thing to do. It is not like going through the hard time and reversing
MSN messenger like many people think.
The IP address is only given when you accept or are sending a file through MSN
messenger. When you send IM's, the message is sent through the server thus hiding
your victims IP and your. But when you send a file or recieve a file, it is direct
connection between the two computers.
To obtain the IP accept a file transfer or send a file to the victim, when the file
sending is under way from the dos prompt type "netstat" without the quotation marks.
You should get a table like this:
Proto Local Address Foreign Address State
TCP kick:1033 msgr-ns29.msgr.hotmail.com:1863 ESTABLISHED
TCP kick:1040 msgr-sb36.msgr.hotmail.com:1863 ESTABLISHED
TCP kick: ESTABLISHED
The top name in the list is the server's address for IMing. There could be many of
the second name in the list, as a new connection is made to the server for every
room you are IMing to. You are looking for the address of the remote host in
this table it may be something similar to "host63-7-102-226.ppp.cal.vsnl.com" or “203..64.90.6�.
without the quotation marks.
All you need to do now is to put this address in you IP lookup programe and get the IP of the remote system.
So dudes...I hope this is helpful for you...
Subscribe to:
Posts (Atom)